
If you’re a homeowner in Miami, you know that a leaky faucet can be both an annoying and costly problem. Fortunately, fixing a leaky faucet in minutes is entirely possible, and I’m here to guide you through the process. In this article, we will explore the necessary steps to fix that pesky drip and save water while doing so. You’ll be amazed at how easy it is to handle this common household issue!
If you prefer to have it handled quickly and professionally, working with experts offering plumbing services in Miami can save you time and prevent further damage.
Identifying the Source of the Leak
The first step in fixing a leaky faucet is to identify the source of the leak. This will help you understand what parts you might need to replace. Most commonly, leaks occur due to worn-out washers, O-rings, or seals. Sometimes, the faucet itself may need a thorough cleaning.
Common Causes of Faucet Leaks
- Worn Washers: Over time, washers can wear down and become ineffective.
- Damaged O-Rings: These rings can become brittle and lose their sealing ability.
- Corroded Valve Seats: Corrosion can lead to uneven surfaces, causing leaks.
- Loose Parts: Sometimes, a simple tightening of screws can eliminate the leak.
Once you have identified the source, you can move on to the next steps!
Gathering Necessary Tools and Materials
Before you begin the repair, make sure you have all the necessary tools and materials. This can save you time and frustration later.
- Adjustable Wrench: For loosening and tightening nuts.
- Screwdriver: Often, a Phillips or flathead will be required.
- Replacement Parts: Washers, O-rings, or entire faucet kits depending on the damage.
- Towel: To catch any drips or spills.
- Plumber’s Grease: To lubricate new parts and ensure a good seal.
Turning Off the Water Supply
Before making any repairs, it’s essential to turn off the water supply to your faucet. This step cannot be overstated; it prevents a mini-waterfall from occurring in your kitchen or bathroom. You usually can find the shut-off valves under the sink. If you can’t locate them, it might be necessary to turn off the main water supply for your home.
Checking the Shut-Off Valves
- Ensure that the valves are working properly by turning them clockwise to close.
- If the valves are stuck or leaking, consider replacing them as well.
- Once the valves are closed, turn on the faucet to relieve any pressure and ensure no water flows.
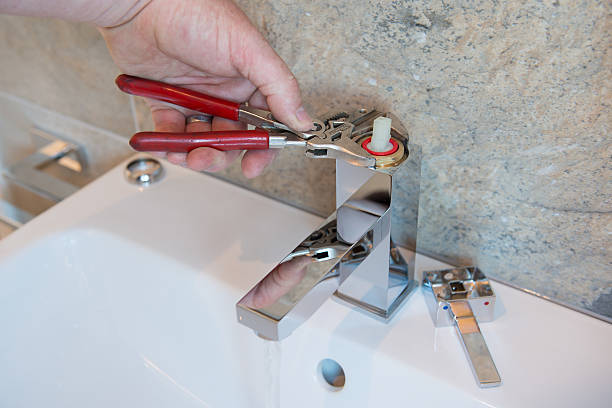
Disassembling the Faucet
With the water supply turned off, it’s time to disassemble the faucet. Depending on the type of faucet you have (compression, cartridge, ball, or ceramic disc), the disassembly process may vary slightly.
Steps to Disassemble
- Use a screwdriver to remove any decorative caps, if applicable.
- Loosen and remove the handle by unscrewing it.
- Take off the packing nut with an adjustable wrench.
- Carefully pull out the stem or cartridge, depending on your faucet type.
Inspect the parts as you disassemble them; look for signs of wear or damage. It’s also a great idea to take pictures during this process. This will be helpful when you’re reassembling everything!
Replacing Worn Parts
Now that you have your faucet disassembled, it’s time to replace any worn parts. This is where having your replacement parts handy comes in handy. If you’re unsure what parts to buy, take the old ones with you to the hardware store for comparison.
Installing New Washers or O-Rings
- Start by removing the old washer or O-ring from the faucet.
- Apply a small amount of plumber’s grease to the new washer or O-ring.
- Carefully install the new part, ensuring a snug fit.
Once replaced, you can proceed to reassemble the faucet in the reverse order of disassembly.
Reassembling the Faucet
With your new parts installed, it’s time to reassemble the faucet.
- Insert the stem or cartridge back into the faucet body.
- Replace the packing nut and tighten it securely, but avoid overtightening.
- Reattach the handle and decorative caps, if applicable.
Turning On the Water Supply
Before you test your handiwork, ensure everything is securely assembled. Then, turn the water supply back on slowly. It’s best to do this gradually to avoid any sudden pressure changes that could cause leaks.
Testing for Leaks
- Turn on the faucet and check for any drips or leaks.
- If everything looks good, you’ve successfully fixed the leak!
- In case of ongoing leaks, you may need to revisit your repair or consult a professional.
Frequently Asked Questions
How long does it take to fix a leaky faucet?
Most homeowners can fix a leaky faucet in about 30 minutes to an hour.
Do I need special tools?
No, basic tools like a wrench and screwdriver are enough.
Can I prevent leaks in the future?
Yes, regular maintenance helps prevent future issues.
When should I call a professional?
If the leak persists or you’re unsure about the repair.
Final Thoughts
With these simple steps, fixing a leaky faucet in minutes is not only achievable but also empowering. You’ll not only save money on your water bill but also gain the satisfaction of completing a DIY project successfully.
If you need help with plumbing repairs or want a professional to handle the job, contact Handyman in Miami today for reliable and affordable services.